Saturday, January 21, 2012

Sourdough Starter and Sourdough Bread Recipe

100_7862            100_7824


Sourdough Bread is made with yeast ‘starter’ which uses the yeast that occurs naturally in the atmosphere and in the flour. Despite the time needed to ‘grow’ the starter, it is not a difficult bread to make, and leftover starter can continue to be ‘fed’ to make more sourdough loaves.

Starter Ingredients:

100 g Strong White Bread Flour (Type 550)

100 ml Tepid Water (cooled, boiled water)

1. For the Starter: Stir the flour and the water together in a bowl to make a sticky paste. Cover with a damp tea-towel (not cling film) and leave on the kitchen counter for 2 days, dampening the tea-towel again as needed to keep it moist. If after 2 days the mixture looks bubbly and has a milky smell, you can proceed to the first feed. ( It may take up to 4 days to reach this stage, mine took 3 days). If there are patches of mould or the paste smells sour or bad, throw it away and start again with a new batch of starter.

To ‘Feed’:

200 g – 300 g Strong White Bread Flour

2. To ‘feed’, stir in 100 g of flour and enough tepid water to make a soft, paste-like dough. Cover the bowl with a damp tea-towel again and leave as before for 24 hours. At this point the starter will look very active and bubbly. Stir well, then add 200 g of flour and enough tepid water to make a dough as before. Cover again and leave for 12 hours. If the starter looks very bubbly and lively, it is ready to use. If it seems only slightly bubbly, give it one more feed and wait for 6 hours.

100_7864

Sourdough Bread Dough Ingredients: (makes 1 large loaf or 2 small loaves)

700 g Strong White Bread Flour (Type 550)

1 Table Spoon of Salt

2 Table Spoons of Sugar

400 ml Tepid Water (cooled, boiled water)

220 g of Sourdough Starter

Sourdough Bread:

1. For the dough; mix all the flour, salt and sugar in a large bowl.

2. Weigh out 220 g of sourdough starter and add 200 ml of tepid water to the starter, mix and  stir well

3. Add the sourdough starter and water mix to the flour. Gradually work the liquid mix into the flour. Then add the remaining tepid water and mix to form a firm dough. You may need to add a little more water, if the dough feels too dry or crumbly or you may need to add a little more flour if the dough feels too sticky.

4.Turn the dough out onto a floured surface and knead hard for about 10 minutes. It should be smooth

5. Return the dough to the cleaned and greased bowl, cover with a damp tea-towel or lightly greased cling film and leave to rise in a warm place for 3-8 hours or until doubled in size. Rising time depends on the room temperature and on the strength of your starter. (A new starter will give a slow rise and less volume than one that is well established)

7. Turn out the risen dough onto a floured surface and knock it back with your knuckles to its original size.

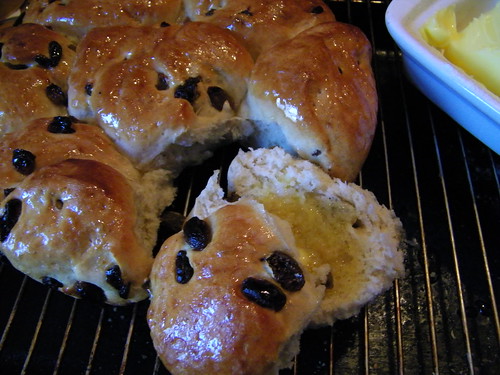
8. Grease and dust (with flour) a large bread tin and shape the dough to fit the tin. Or you could divide the dough into halves and place it into 2 smaller bread tins. (At this stage I added sultanas to one of the small loaves and kneaded them into the dough to make a small sultana loaf. I left the other loaf plain). Leave the dough to rise in the tin and cover with a damp tea-towel or lightly greased cling film. After 2-6 hours it should have doubled in size.

9. Preheat the oven. Dust the risen dough with a little flour (optional) and place in the oven at 220 C (425 F, gas mark 7). Bake for about 30 minutes. Check after 15 minutes and turn down the heat if the loaves seems to brown too quickly.

10. After baking, transfer the bread to a wire rack and leave to cool.

100_7858

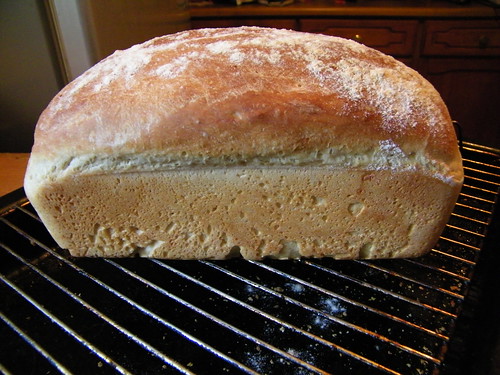
(Large Sourdough Loaf, sprinkled with Sesame Seeds)

100_7846

( 2 Small Sourdough Loaves; one sprinkled with Sesame Seeds and one baked with sultanas)

Leftover Sourdough Starter can be kept in an airtight container in the fridge. Although I prefer to keep a loose lid on my container because of the pressure building during fermentation.  Before using it to make another loaf, bring it back to room temperature, then feed it once as in the main recipe and leave for about 6 hours. Each time you make a loaf, you will have leftover starter. This can be kept in the fridge, feeding it every 4 days to keep it alive and to improve in flavour.

Any starter you do not need or do not want, can be discarded or given to a friend. Sourdough starter can last for decades and seems to be resistant to contamination. This may be due to an antibiotic action, similar to that of moulds in cheeses such as Stilton or Roquefort.

Saturday, January 14, 2012

Sultana Crown Loaf Recipe


100_7810


Ingredients: (Makes 2 Loaves)

700g of Strong White Bread Flour
7g or 1 Sachet of Allinson Easy Bake, Fast Active Yeast
30g or 1 Ounce of Butter ( I used Willow Butter, which is ideal for baking but I have used Lard in the past instead)
1 1/2 teaspoons of Salt
3 teaspoons of Sugar
200g of Sultanas
400ml of cooled boiled water ( fairly warm but not hot)

( I used an electric whisk with dough hooks attached!)


Method:
1. Sieve 700g of Strong White Bread Flour into a large bowl and add the salt and the sugar. Mix well with a whisk (only use the special kneading tools of the whisk).( If you haven't got a whisk you can do all the mixing and kneading by hand but for the first stage of dough preparation I always use the whisk, until the dough becomes too firm and can only be kneaded by hand.)
2. Add the 7g of yeast to the flour, salt and sugar mix and whisk well.
3. Slice the butter and add to the mix. Whisk well...
4. Add 200g of Sultanas, whisk well.
5. While still whisking, gradually add the warm water. Keep whisking on a low setting until the dough becomes firm and most of the flour is consumed.
6. Take the dough out of the bowl and put it on a lightly floured work surface.
7. Knead the dough very hard by hand for up to 10 minutes, hitting, punching and rolling it.
8. After 10 minutes, prepare 2 Bread Tins (If they are not non-stick, you will have to grease them with a little oil or butter) ( For this recipe I used 2 round, metal pie dishes)
9. Form the dough into a long roll and cut into 12 or 13 equal slices.
10. Roll the dough slices in the palm of your hands into balls and place them into the tins. (I usually start with the one in the middle and place the other 5 or 6 balls around them) Don't worry if there are gaps in-between, these will fill out automatically when the dough rises.
11. Grease 2 sheets of cling film with a little butter and place loosely over the dough. Now loosely cover with a tea towel.
12. Leave to rise in a warm place for about 1 hour or even 1 1/2hours, depending on the room temperature.
13. After 1 1/2 hours the dough should have doubled in size; take off tea towels and cling film and place into the oven.
14. Cook on 200 C. for about 25 to 30 minutes. ( I do not pre-heat the oven for this recipe)
15. After 20 minutes, check the loaves; once they have reached a nice brown colour, turn off the oven. I like mine slightly darker than golden brown.
16. Remove loaves from oven and turn them out onto a wire rack.
17. Leave them to cool a little and then use a mix of icing sugar and water for the final glaze. Done!

100_7811                 100_7813
Happy Baking...I hope my recipe is easy to follow and I have explained things properly.
Maria xxx

Tuesday, January 3, 2012

Sourdough Bread Loaf - Sauerteig Brot

Via Flickr:
Baked with homemade yeast starter. I have added a little sugar to this recipe and it has definitely improved the taste.

Gebacken mit hausgemachter Hefe. Ich habe diesem Rezept ein wenig Zucker zugefuehrt und es hat den Geschmack ausserordentlich verbessert.

אפוי עם המתנע שמרים תוצרת בית. הוספתי קצת סוכר למתכון הזה וזה בהחלט שיפר את הטעם.

Monday, January 2, 2012

A buttered piece of Sultana Crown Bread - Ein gebuttertes Stueckchen von Sultanien Kronen Brot

Via Flickr:
I called this bread, Sultana Crown Bread because of it's shape and it's ingredients. It tastes best, fresh out of the oven with a bit of butter...wonderful!

Ich habe dieses Brot, Sultaninen Kronen Brot benannt, wegen seiner Form und seiner Zutaten. Es schmeckt am besten wenn es noch ofenfrisch ist und man es mit etwas Butter bestreicht....wundervoll!

קראתי את הלחם הזה, לחם סולטנה הכתר בגלל הצורה שזה מרכיבים וזהו. זה הכי טעים, טרי מהתנור עם קצת חמאה ... נפלא!

White Loaf - Weissbrot

White Loaf - Weissbrot by abracacamera
White Loaf - Weissbrot, a photo by abracacamera on Flickr.
Via Flickr:
Freshly baked this morning, this white bread loaf must be the easiest loaf to bake. It tastes wonderful when it is still slightly warm and the butter just melts as you spread it over the oven-fesh, warm slice....simply delicious!!! The aroma of fresh baked bread fills the whole house....mmmmhhhhmmmm

Heute morgen frisch gebacken; dieses Weissbrot duerfte wohl das einfachste Brot sein, dass man backen kann. Es schmeckt wundervoll, wenn es noch warm ist und die Butter schmelzt so langsam ueber das noch ofenfrische, warme Schnittchen....einfach lecker!!! Der Duft von frisch gebackenem Brot erfuellt das ganze Haus.....mmmhhhhmmmm

אפוי טרי הבוקר, זה כיכר לחם לבן חייב להיות כיכר הקלה ביותר לאפות. יש לו טעם נפלא כאשר הוא עדיין חם מעט חמאה רק נמס כמו שאתה להפיץ אותו מעל הפרוסה, בתנור חם טרי .... פשוט טעים! ניחוח של לחם טרי הממלא את הבית כולו .... mmmmhhhhmmmm